


- Introduction
- Maintenance
- Preparation
- Service specifications
- Diagnostics
- 2JZ-GE Engine
- 2JZ-GTE Engine
- 2JZ-GTE Turbocharging
- 2JZ-GE Emission control
- 2JZ-GTE Emission control
- 2JZ-GE SFI
- 2JZ-GTE SFI
- Cooling
- Lubrication
- Ignition system 2JZ-GE
- Ignition system 2JZ-GTE
- Starting system
- Charging system
- Clutch
- W58 manual transmission
- V160 manual transmission
- A340E 2JZ-GE automatic transmission
- A340E 2JZ-GTE automatic transmission
- Propeller shaft
- Suspension and axle
- Brake system
- Steering
- Supplemental restraint system
- Body electrical system
- Body
- Air conditioning system
- Install oil pump
- Remove any old packing (FIPG) material and be careful not to drop any oil on the contact surfaces of the oil pump and cylinder block.
- Using a razor blade gasket scraper, remove all the old packing (FIPG) material from the gasket surfaces and sealing groove.
- Thoroughly clean all components to remove all the debris.
- Using a non-residue solvent, clean both sealing surfaces.
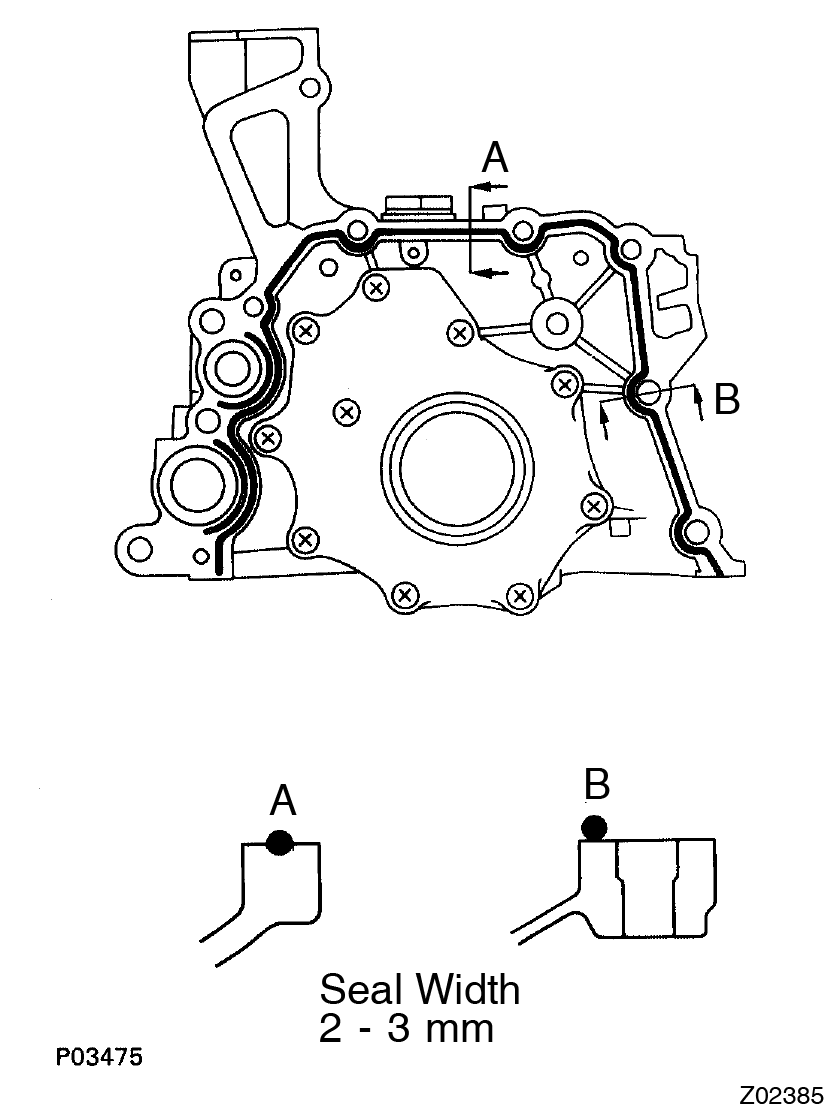
- Apply seal packing to the oil pump as shown in the illustration.
Seal packing:
Part No. 08826-00080 or equivalent- Install a nozzle that has been cut to a 2 - 3 mm (0.08 - 0.12 in.) opening.
Avoid applying an excessive amount to the surface. Be particularly careful near oil passages.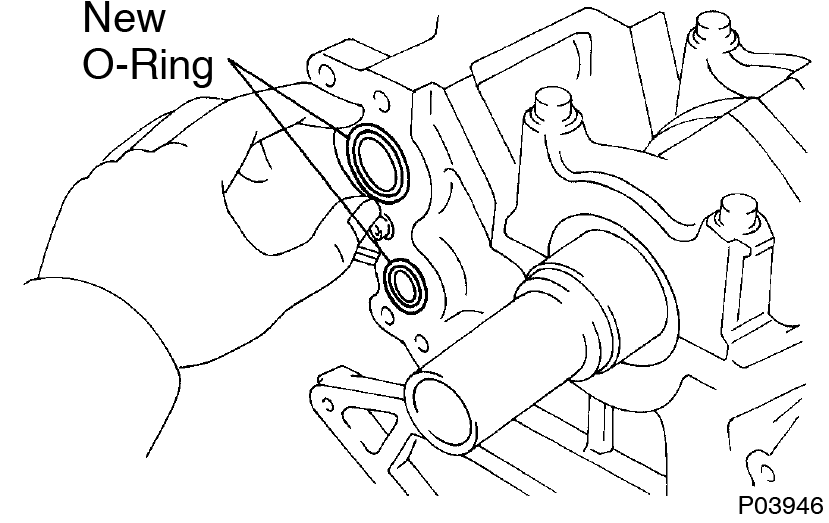
- Parts must be assembled within 5 minutes of application. Otherwise the material must be removed and reapplied.
- Immediately remove nozzle from the tube and reinstall cap.
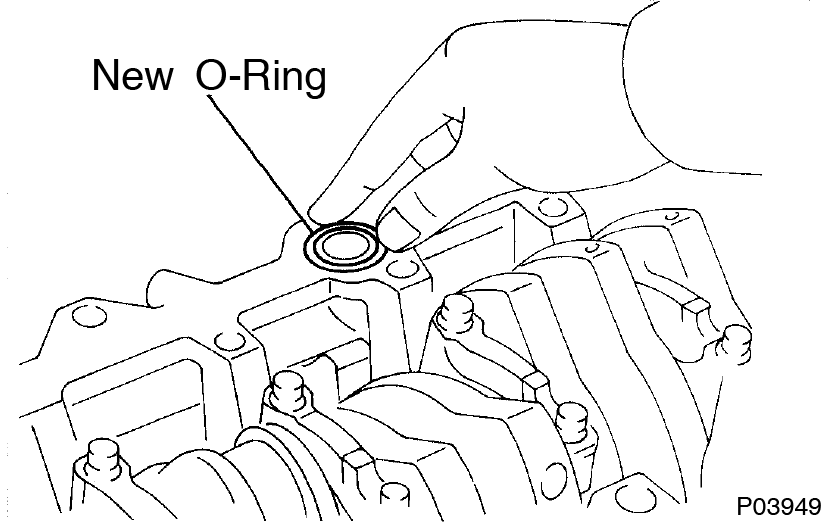
- Place 2 new O-rings in position on the cylinder block.
- Install the oil pump with the 9 bolts.
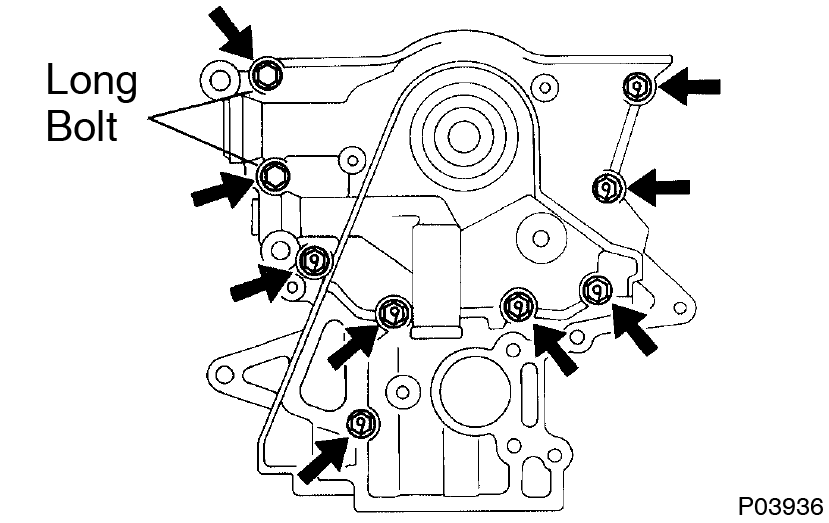 Torque: 21 N·m (210 kgf·cm, 15 ft·lbf)
- Remove any old packing (FIPG) material and be careful not to drop any oil on the contact surfaces of the oil pump and cylinder block.
- Install No.1 oil pan
- Remove any old packing (FIPG) material and be careful not to drop any oil on the contact surfaces of the No.1 oil pan and cylinder block.
- Using a razor blade and gasket scraper, remove all the old packing (FIPG) material from the gasket surfaces and sealing groove.
- Thoroughly clean all components to remove all the debris.
- Using a non-residue solvent, clean both sealing surfaces.
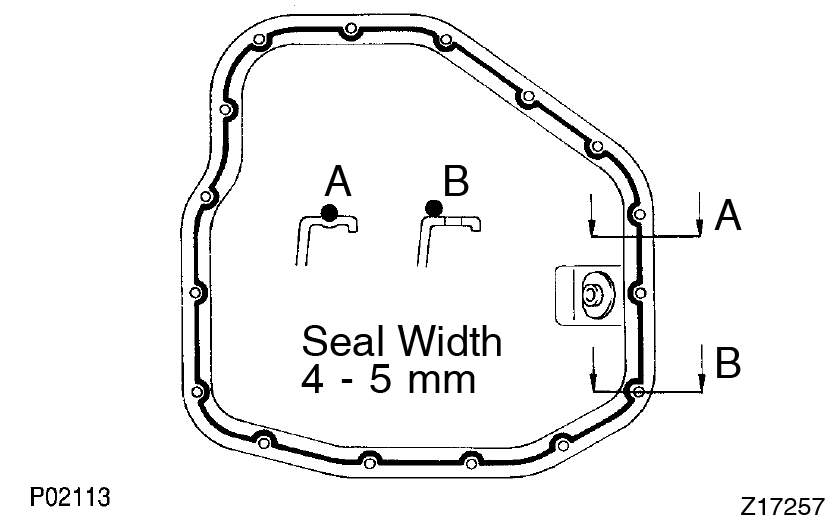
Do not use a solvent which will affect the painted surfaces. - Apply seal packing to the No.1 oil pan as shown in the illustration.
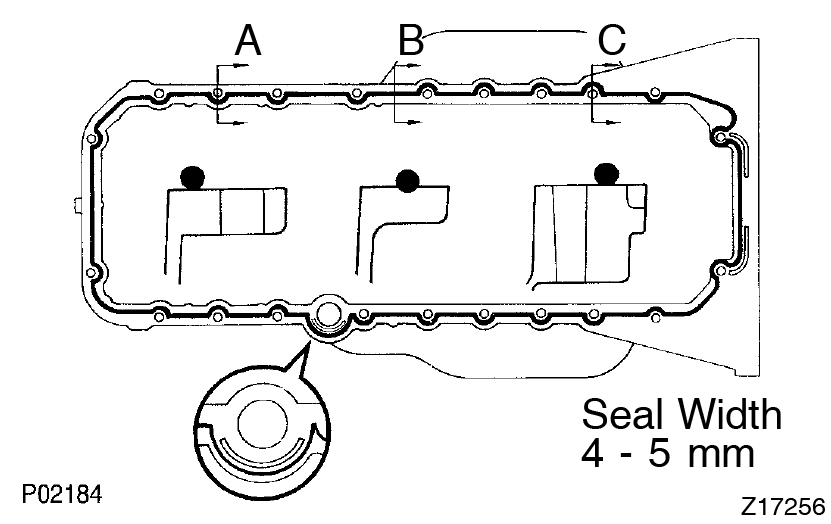 Seal packing:
Parts No. 08826-00080 or equivalent- Install a nozzle that has been cut to a 4 - 5 mm (0.16 - 0.20 in.) opening.
Avoid applying an excessive amount to the surface.- Parts must be assembled within 5 minutes of application. Otherwise the material must be removed and reapplied.
- Immediately remove nozzle from the tube and reinstall cap.
- Place a new O-ring in the position on the cylinder block.
- Install the No.1 oil pan with the 22 bolts.
Torque:
12 mm head
21 N·m (210 kgf·cm, 15 ft·lbf)
14 mm head
39 N·m (400 kgf·cm, 29 ft·lbf)
- Remove any old packing (FIPG) material and be careful not to drop any oil on the contact surfaces of the No.1 oil pan and cylinder block.
- 2JZ-GTE
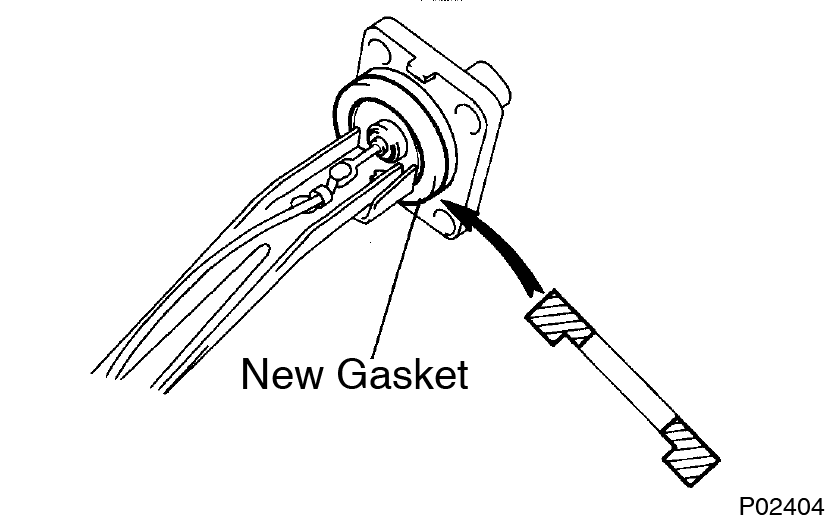
Install turbo oil outlet pipe- Install a new gasket and the oil outlet pipe with the 2 nuts.
Torque: 27 N·m (280 kgf·cm, 20 ft·lbf) - Connect the 2 turbo oil outlet hoses.
- Install a new gasket and the oil outlet pipe with the 2 nuts.
- Install oil pan baffle plate
Torque: 8.8 N·m (90 kgf·cm, 78 in.·lbf) - Install oil strainer
Install a new gasket and the oil strainer with the bolt and 2 nuts.
Torque: 8.8 N·m (90 kgf·cm, 78 in.·lbf) - Install No.2 oil pan
- Remove any old packing (FIPG) material and be careful not to drop any oil on the contact surfaces of the No.1 and No.2 oil pans.
- Using a razor blade and gasket scraper, remove all the old packing (FIPG) material from the gasket surfaces and sealing groove.
- Thoroughly clean all components to remove all the debris.
- Using a non-residue solvent, clean both sealing surfaces.
Do not use a solvent which will affect the painted surfaces. - Apply seal packing to the No.2 oil pan as shown in the illustration.
 Seal packing:
Part No. 08826-00080 or equivalent- Install a nozzle that has been cut to a 4 - 5 mm (0.16 - 0.20 in.) opening.
Avoid applying an excessive amount to the surface.- Parts must be assembled within 5 minutes of application. Otherwise the material must be removed and reapplied.
- Immediately remove nozzle from the tube and reinstall cap.
- Install the No.2 oil pan with the 14 bolts and 2 nuts.
Torque: 8.8 N·m (90 kgf·cm, 78 in.·lbf)
- Remove any old packing (FIPG) material and be careful not to drop any oil on the contact surfaces of the No.1 and No.2 oil pans.
- Install oil level sensor
- Install a new gasket to the level sensor.
- Install the level sensor with the 4 bolts.
Torque: 5.4 N·m (55 kgf·cm, 48 in.·lbf) - Connect the level sensor connector.
- Install oil dipstick guide and dipstick
- Install a new O-ring on the dipstick guide.
- Apply new oil to the O-ring.
- Connect the dipstick guide end to the dipstick tube of the oil pan.
- Install the dipstick guide with the bolt.
- Install the dipstick.
- Install crankshaft timing pulley and idler pulley
(2JZ-GE: See page EM-19 )
(2JZ-GTE: See page EM-21 ) - 2JZ-GTE M/T:
Install drive belt tensioner bracket
Torque: 27 N·m (280 kgf·cm, 20 ft·lbf) - Install timing belt
(2JZ-GE: See page EM-19 )
(2JZ-GTE: See page EM-21 ) - Install crankshaft position sensor
Torque: 9.0 N·m (90 kgf·cm, 80 in.·lbf) - Install generator (See page CH-18 )
- Remove engine stand from engine
- Assembly engine and transmission
(2LZ-GE: See page AT-24)
(2JZ-GTE: See page EM-65 ) - Install engine with transmission
(2JZ-GE: See page EM-57 )
(2JZ-GTE: See page EM-65 )
This guide is based on the book edition Toyota (RM502U, 1997)